In recent years deep learning is a huge success in the world of computer vision, making deep learning the new tool in the digital image analysis. It has made computers understand the visual data much better than ever before. In this article, I’ll go into details about one specific task in computer vision: Semantic Segmentation using the UNET Architecture.
What is Semantic Segmentation
Semantic segmentation is the process of identifying and classifying each pixel in an image to a specific class label. These labels could be a person, car, flower, etc. It can be considered as a classification problem but at the pixel level. As we are predicting for every pixel in the image, this task is commonly referred to as dense prediction.
Some of the common applications of semantic segmentation are:
- Autonomous vehicles
- Human-Computer Interaction
- Robotics
- Photo Editing
In this article, we are going to learn how to build and implement the UNet architecture and for this, we are going to use the TensorFlow Keras library by Google.
What is UNet
U-Net is a convolutional neural network that is designed for performing semantic segmentation on biomedical images by Olaf Ronneberger, Philipp Fischer, Thomas Brox in 2015 at the paper “U-Net: Convolutional Networks for Biomedical Image Segmentation”. Its architecture is built and modified in such a way that it yields better segmentation with less training data. It is build using the fully convolutional network (FCN), which means that only convolutional layers are used and no dense or recurrent layers are used at all.
Architecture
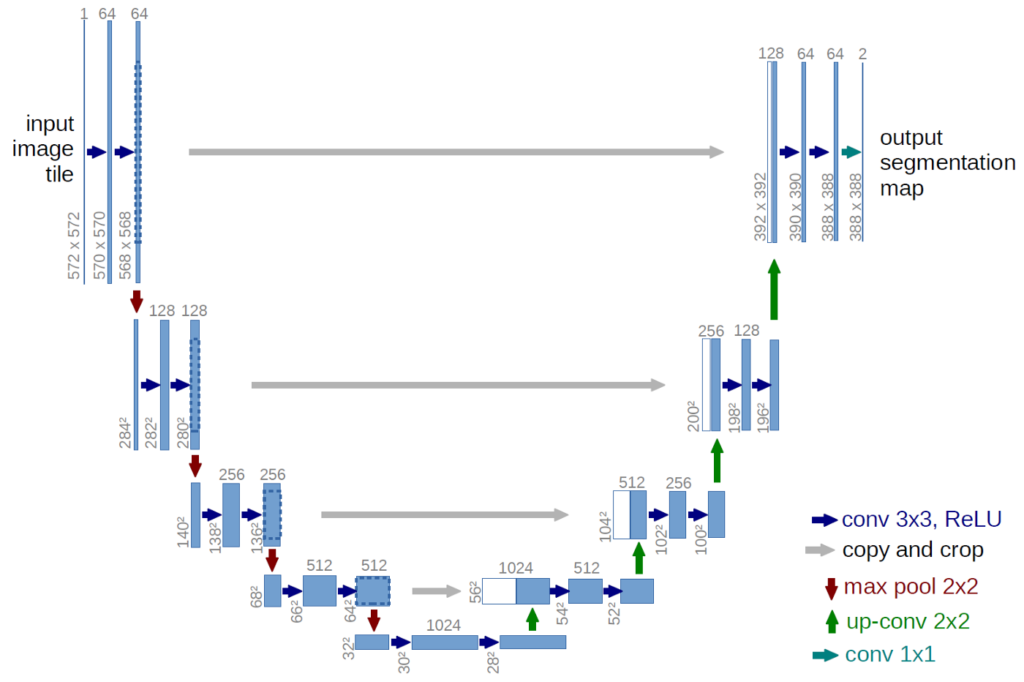
The UNet is a ‘U’ shaped network which consists of three parts:
- The Contracting/Downsampling Path
- Bottleneck
- The Expanding/Upsampling Path
Downsampling Path
It consists of two 3×3 convolutions (unpadded convolutions), each followed by a rectified linear unit (ReLU) and a 2×2 max pooling operation with stride 2 for downsampling. At each downsampling step we double the number of feature channels.
Upsampling Path
Every step in the expansive path consists of an upsampling of the feature map followed by a 2×2 convolution (“up-convolution”), a concatenation with the correspondingly feature map from the downsampling path, and two 3×3 convolutions, each followed by a ReLU.
Skip Connection
The skip connections from the downsampling path are concatenated with the feature map during upsampling path. These skip connections provide local information to global information while upsampling.
Final Layer
At the final layer a 1×1 convolution is used to map each feature vector to the desired number of classes.
Advantages
- The UNet combines the location information from the downsampling path to finally obtain a general information combining localisation and context, which is necessary to predict a good segmentation map.
- No Dense layer is used, so image sizes can be used.
Dataset
For training the UNet we are using Data Science Bowl 2018 – find the nuclei in divergent images to advance medical discovery.
Implementation
The UNet is implemented using the Python 3 programming language in TensorFlow Keras framework.
Imports
import os
import sys
import random

import numpy as np
import cv2
import matplotlib.pyplot as plt

import tensorflow as tf
from tensorflow import keras

## Seeding
seed = 2019
random.seed = seed
np.random.seed = seed
tf.seed = seed
Data Generator
The DataGen class is used for building generators for training and testing the model.
class DataGen(keras.utils.Sequence):
    def __init__(self, ids, path, batch_size=8, image_size=128):
        self.ids = ids
        self.path = path
        self.batch_size = batch_size
        self.image_size = image_size
        self.on_epoch_end()

    def __load__(self, id_name):
        ## Path
        image_path = os.path.join(self.path, id_name, "images", id_name) + ".png"
        mask_path = os.path.join(self.path, id_name, "masks/")
        all_masks = os.listdir(mask_path)

        ## Reading Image
        image = cv2.imread(image_path, 1)
        image = cv2.resize(image, (self.image_size, self.image_size))

        mask = np.zeros((self.image_size, self.image_size, 1))

        ## Reading Masks
        for name in all_masks:
            _mask_path = mask_path + name
            _mask_image = cv2.imread(_mask_path, -1)
            _mask_image = cv2.resize(_mask_image, (self.image_size, self.image_size)) #128x128
            _mask_image = np.expand_dims(_mask_image, axis=-1)
            mask = np.maximum(mask, _mask_image)

        ## Normalizaing
        image = image/255.0
        mask = mask/255.0

        return image, mask

    def __getitem__(self, index):
        if(index+1)*self.batch_size > len(self.ids):
            self.batch_size = len(self.ids) - index*self.batch_size

        files_batch = self.ids[index*self.batch_size : (index+1)*self.batch_size]

        image = []
        mask  = []

        for id_name in files_batch:
            _img, _mask = self.__load__(id_name)
            image.append(_img)
            mask.append(_mask)

        image = np.array(image)
        mask  = np.array(mask)

        return image, mask

    def on_epoch_end(self):
        pass

    def __len__(self):
        return int(np.ceil(len(self.ids)/float(self.batch_size)))
Hyperparameters
image_size = 128
train_path = "dataset/stage1_train/"
epochs = 5
batch_size = 8

## Training Ids
train_ids = next(os.walk(train_path))[1]

## Validation Data Size
val_data_size = 10

valid_ids = train_ids[:val_data_size]
train_ids = train_ids[val_data_size:]
Model
Here we write the code for different blocks used for the building the UNet model.
def down_block(x, filters, kernel_size=(3, 3), padding="same", strides=1):
    c = keras.layers.Conv2D(filters, kernel_size, padding=padding, strides=strides, activation="relu")(x)
    c = keras.layers.Conv2D(filters, kernel_size, padding=padding, strides=strides, activation="relu")(c)
    p = keras.layers.MaxPool2D((2, 2), (2, 2))(c)
    return c, p

def up_block(x, skip, filters, kernel_size=(3, 3), padding="same", strides=1):
    us = keras.layers.UpSampling2D((2, 2))(x)
    concat = keras.layers.Concatenate()([us, skip])
    c = keras.layers.Conv2D(filters, kernel_size, padding=padding, strides=strides, activation="relu")(concat)
    c = keras.layers.Conv2D(filters, kernel_size, padding=padding, strides=strides, activation="relu")(c)
    return c

def bottleneck(x, filters, kernel_size=(3, 3), padding="same", strides=1):
    c = keras.layers.Conv2D(filters, kernel_size, padding=padding, strides=strides, activation="relu")(x)
    c = keras.layers.Conv2D(filters, kernel_size, padding=padding, strides=strides, activation="relu")(c)
    return c
Next we build the complete UNet architecture in the UNet function. This function uses the down_block, bottleneck and up_block to build the UNet.
def UNet():
    f = [16, 32, 64, 128, 256]
    inputs = keras.layers.Input((image_size, image_size, 3))

    p0 = inputs
    c1, p1 = down_block(p0, f[0]) #128 -> 64
    c2, p2 = down_block(p1, f[1]) #64 -> 32
    c3, p3 = down_block(p2, f[2]) #32 -> 16
    c4, p4 = down_block(p3, f[3]) #16->8

    bn = bottleneck(p4, f[4])

    u1 = up_block(bn, c4, f[3]) #8 -> 16
    u2 = up_block(u1, c3, f[2]) #16 -> 32
    u3 = up_block(u2, c2, f[1]) #32 -> 64
    u4 = up_block(u3, c1, f[0]) #64 -> 128

    outputs = keras.layers.Conv2D(1, (1, 1), padding="same", activation="sigmoid")(u4)
    model = keras.models.Model(inputs, outputs)
    return model
After we finished building the UNet model, we compile this model. For this experiment, we uses Adam optimizer, binary crossentropy as loss function and accuracy as the metric to measure the performance.
model = UNet()
model.compile(optimizer="adam", loss="binary_crossentropy", metrics=["acc"])
Training
Here we create the two data generator, one for the training using the training data and other using the validation data. After that we start training the model.
train_gen = DataGen(train_ids, train_path, image_size=image_size, batch_size=batch_size)
valid_gen = DataGen(valid_ids, train_path, image_size=image_size, batch_size=batch_size)

train_steps = len(train_ids)//batch_size
valid_steps = len(valid_ids)//batch_size

model.fit_generator(train_gen, validation_data=valid_gen, steps_per_epoch=train_steps, validation_steps=valid_steps, epochs=epochs)



Usually I do not read post on blogs, however I would like to say that your blog is very pressured to read! Your writing style has been amazed me. Thanks, very nice post.
Hi Nikhil,
Very nice and well explained blog post. I have a question. Why do you use upsampling instead of upconvolution as was done in the Unet paper?