All the technological advancements in the field of Artificial Intelligence (AI) is facilitated due to the availability large amount of dataset and the computational hardware’s like GPU’s and TPU’s. In some fields like medical imaging, the availability of huge amount of data is not possible, as it takes good amount of efforts to collect the data and then labelling it requires the domain expertise. To, solve this issue, we use data augmentation. In this article, we will go through the process of applying data augmentation to any semantic segmentation dataset.
Overview:
- What is Data Augmentation?
- Why do we use Data Augmentation?
- When not to use Data Augmentation?
What is Data Augmentation?
Data augmentation is the process of that enables you to increase amount of training data by making some reasonable modifications or transformations in your existing data.
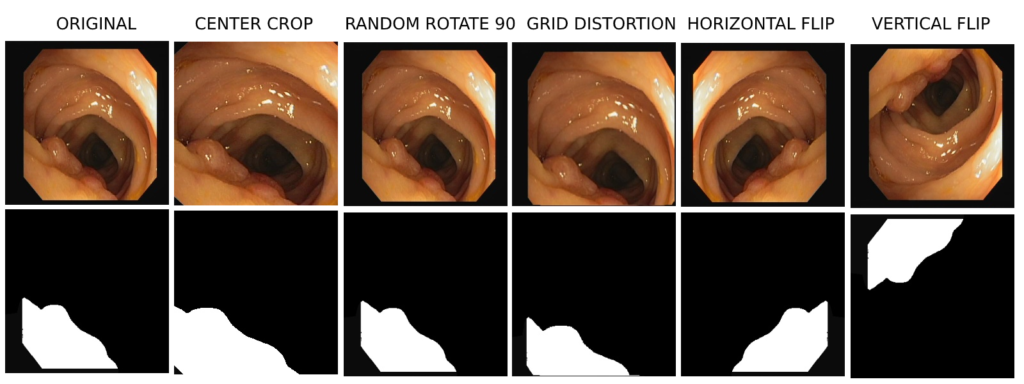
For example, we can augment an image by flipping it vertically or horizontally. We could rotate the image, crop it or even add some noise. All these are some of the most common form of data augmentation.
Why do we use Data Augmentation?
We use data augmentation to increase the samples in the training dataset. Let us assume, we have a small training dataset and it is difficult to get more data, then we can use data augmentation to create new data from our existing data.
Data augmentation helps to reduce overfitting. Assume that you have a dataset full of images of dogs and most of the dogs were facing the right side. If we train a model on these images, it is reasonable to think that the model would believe that only these right-facing dogs were actually dogs not it may not very well classify left-facing dogs as being actual dogs. Now this model would not work very well in the real-world. So, we would apply data augmentation and produce a variety of images with different orientation, location, scale, brightness etc. These images would introduce variance and make the model more robust.
When not to use Data Augmentation?
In some cases data augmentation techniques may not be appropriate. Let us continue with the example of the dog. It is reasonable to flip the dog image horizontally, but it would not be reasonable to flip it vertically. As in the real-world we would not be seeing many images of dogs flipped upside-down on their head.
Let’s say we have an image of STOP sign from the Traffic Sign dataset. It would not be reasonable to either flip it horizontally or vertically, as it would change the meaning of the image.
Implementation
In the following code, we are going to apply data augmentation to a semantic segmentation dataset.
Import
Here, we import all the required the libraries and the function required.
import os
import cv2
from tqdm import tqdm
from glob import glob
from albumentations import CenterCrop, RandomRotate90, GridDistortion, HorizontalFlip, VerticalFlip
- The cv2 library is used to read the image, resize it and save the numpy array back into an image form.
- The tqdm function is used to display the progress bar in the for loop.
- The glob function is used to find all the path matching a specified pattern.
- Next, from the albumentations library, we import five functions that helps us to transform our image and mask and create an augmented dataset.
Load Data
The load_data function takes the path of the dataset and gives you a list of images and masks path.
def load_data(path):
     images = sorted(glob(os.path.join(path, "images/")))
     masks = sorted(glob(os.path.join(path, "masks/")))
     return images, masks
Creating Empty Directory
The create_dir function takes a path and create an empty directory if it does not exist.
def create_dir(path):
    if not os.path.exists(path):
        os.makedirs(path
Data Augmentation
Now, we are going to write a function called augment_data, that will help us to augment our original dataset.
Take a look at the complete function, now we are going to break this complete function to understand it more clearly.
def augment_data(images, masks, save_path, augment=True):
    H = 256
    W = 256

    for x, y in tqdm(zip(images, masks), total=len(images)):
        name = x.split("/")[-1].split(".")
        """ Extracting the name and extension of the image and the mask. """
        image_name = name[0]
        image_extn = name[1]

        name = y.split("/")[-1].split(".")
        mask_name = name[0]
        mask_extn = name[1]

        """ Reading image and mask. """
        x = cv2.imread(x, cv2.IMREAD_COLOR)
        y = cv2.imread(y, cv2.IMREAD_COLOR)

        """ Augmentation """
        if augment == True:
            aug = CenterCrop(H, W, p=1.0)
            augmented = aug(image=x, mask=y)
            x1 = augmented["image"]
            y1 = augmented["mask"]

            aug = RandomRotate90(p=1.0)
            augmented = aug(image=x, mask=y)
            x2 = augmented['image']
            y2 = augmented['mask']

            aug = GridDistortion(p=1.0)
            augmented = aug(image=x, mask=y)
            x3 = augmented['image']
            y3 = augmented['mask']

            aug = HorizontalFlip(p=1.0)
            augmented = aug(image=x, mask=y)
            x4 = augmented['image']
            y4 = augmented['mask']

            aug = VerticalFlip(p=1.0)
            augmented = aug(image=x, mask=y)
            x5 = augmented['image']
            y5 = augmented['mask']

            save_images = [x, x1, x2, x3, x4, x5]
            save_masks =  [y, y1, y2, y3, y4, y5]

        else:
            save_images = [x]
            save_masks = [y]

        """ Saving the image and mask. """
        idx = 0
        for i, m in zip(save_images, save_masks):
            i = cv2.resize(i, (W, H))
            m = cv2.resize(m, (W, H))

            if len(images) == 1:
                tmp_img_name = f"{image_name}.{image_extn}"
                tmp_mask_name = f"{mask_name}.{mask_extn}"

            else:
                tmp_img_name = f"{image_name}_{idx}.{image_extn}"
                tmp_mask_name = f"{mask_name}_{idx}.{mask_extn}"

            image_path = os.path.join(save_path, "images", tmp_img_name)
            mask_path = os.path.join(save_path, "masks", tmp_mask_name)

            cv2.imwrite(image_path, i)
            cv2.imwrite(mask_path, m)

            idx += 1
The augment_data function takes four parameters:
def augment_data(images, masks, save_path, augment=True):
- images: It is a list containing the paths of all the images.
- masks: It is also a list just images, except it contains the paths for the masks instead of images.
- save_path: This is where we are going to save our augmented images and masks.
- augment: It a boolean variable, which is used to control the augmentation. If it is set to True, then we want to apply the data augmentation and if it is set to False, then we don’t want to apply data augmentation.
    H = 256
    W = 256
Here, we define two variable H and W denoting the height and width in for the final augmented image and mask. We set height and width to 256. So, out augmented dataset would be of size 256 x 256.
for x, y in tqdm(zip(images, masks), total=len(images)):
A for loop is used to iterate over the list of images and masks and tqdm function is used to display the progress of the loop.
        name = x.split("/")[-1].split(".")
        image_name = name[0]
        image_extn = name[1]

        name = y.split("/")[-1].split(".")
        mask_name = name[0]
        mask_extn = name[1]
After the loop, we extract the name and extenstion of both image and mask for their path.
        x = cv2.imread(x, cv2.IMREAD_COLOR)
        y = cv2.imread(y, cv2.IMREAD_COLOR)
Next, we read both the image and mask as an RGB image.
if augment == True:
Next, we use the augment variable. If it is True, we would use the transformation function from the albumentations library to augment the data.
In all the transformation function, you will see a variable p, which is set to 1.0, p refers to the probability of applying the transformation function on the image and mask.
            aug = CenterCrop(H, W, p=1.0)
            augmented = aug(image=x, mask=y)
            x1 = augmented["image"]
            y1 = augmented["mask"]
First, we apply the CenterCrop function to crop the centeral part of the size 256 x 256 (H x W), from both image and the mask.
            aug = RandomRotate90(p=1.0)
            augmented = aug(image=x, mask=y)
            x2 = augmented['image']
            y2 = augmented['mask']
Next, we apply the RandomRotate90 function, which randomly rotate both the image and mask by 90 degree.
            aug = GridDistortion(p=1.0)
            augmented = aug(image=x, mask=y)
            x3 = augmented['image']
            y3 = augmented['mask']
After RandomRotate90, we use GridDistortion to transform both image and mask.
            aug = HorizontalFlip(p=1.0)
            augmented = aug(image=x, mask=y)
            x4 = augmented['image']
            y4 = augmented['mask']
Next, we use HorizontalFlip, to horizontally flip both image and mask.
            aug = VerticalFlip(p=1.0)
            augmented = aug(image=x, mask=y)
            x5 = augmented['image']
            y5 = augmented['mask']
And at last, we apply VerticalFlip and vertically flip the image and mask.
            save_images = [x, x1, x2, x3, x4, x5]
            save_masks =  [y, y1, y2, y3, y4, y5]
We save original image and augmented image in the save_images and like this we save the masks in the save_masks variable.
        else:
            save_images = [x]
            save_masks = [y]
If the augment is set to False, we don’t use transformation function and only save the original image and mask.
Now, we have a list of images and masks that we want to save in the save_path.
        idx = 0
        for i, m in zip(save_images, save_masks):
Here, we are going to iterate over the save_images and save_masks.
            i = cv2.resize(i, (W, H))
            m = cv2.resize(m, (W, H))
Next, we are going to resize the image and mask to 256 x 256.
            if len(images) == 1:
                tmp_img_name = f"{image_name}.{image_extn}"
                tmp_mask_name = f"{mask_name}.{mask_extn}"
            else:
                tmp_img_name = f"{image_name}_{idx}.{image_extn}"
                tmp_mask_name = f"{mask_name}_{idx}.{mask_extn}"
After resizing the image and mask, we are going give proper name to image and mask we are going to save.
            image_path = os.path.join(save_path, "images", tmp_img_name)
            mask_path = os.path.join(save_path, "masks", tmp_mask_name)
Now, we set the proper path where image and mask are going to be saved.
            cv2.imwrite(image_path, i)
            cv2.imwrite(mask_path, m)

            idx += 1
Finally, we save the image and mask.
Main
if __name__ == "__main__":
    path = "CVC-612/"
    images, masks = load_data(path)
    print(f"Original Images: {len(images)} - Original Masks: {len(masks)}")
Here we have the path variable contained the location of the dataset. We give the path variable to load_data function to get the list of images and masks path.
    create_dir("new_data/images")
    create_dir("new_data/masks")
We create the directories of saving the augmented images and masks.
augment_data(images, masks, "new_data", augment=True)
We now call the augment_data function and augment the original dataset and save the augmented dataset in the save_path.
    images, masks = load_data("new_data/")
    print(f"Augmented Images: {len(images)} - Augmented Masks: {len(masks)}")
Here, we load the augmented images and masks.

The original dataset has 16 image and mask. After applying some data augmentation technique, we increase the dataset size by 5 times.

Thanks for sharing, this is a fantastic blog. Thanks Again. Fantastic. Holly Reidar Alissa