Image segmentation is an important area of computer vision that involves dividing an image into multiple segments, each of which corresponds to a different object. Background removal is one of the crucial applications of image segmentation that involves separating foreground objects from the background. This can be useful in various domains, such as video and image editing, object recognition, and autonomous vehicles, among others.
In this blog post, we will explore how to perform background removal using image segmentation in TensorFlow. We will provide you with an explanation of each step involved in building a background removal model using TensorFlow. So, whether you are a beginner or an experienced data scientist, this post will give you a good understanding of the fundamentals of image segmentation and how to implement it in TensorFlow.
Introduction
The entire process of image segmentation-based background removal is as follows:
- Model: Implementation of an image segmentation architecture.
- Dataset: We will use the person segmentation dataset.
- Training: We are going to use the dataset and train our model.
- Prediction: Now, we will use the trained model to predict the background on the new images and video frames.
Dataset
Download the dataset: Person Segmentation
The dataset contains 5678 pair of images and their respective binary mask. The binary mask helps to segment the main object (human) from the images.
Project Structure
The project contains four important files and a weight file.
.
├── files
│   ├── data.csv
│   └── model.h5
├── model.py
├── predict.py
├── train.py
└── video.py
- model.h5: it is the trained weight file.
- model.py: it contains the implementation of the model.
- predict.py: It is used to predict the mask and then use it to remove the background from images.
- video.py: It is used to remove the background from videos.
Architecture Implementation
We will begin with the implementation of the image segmentation architecture, which would be used to predict the mask. In designing an efficient architecture, we will begin with a pre-trained ResNet50 as an encoder. Next, we will also use dilated convolution and residual block.
Imports
First, we will import all the required libraries.
from tensorflow.keras.layers import Conv2D, BatchNormalization, Activation, UpSampling2D, Concatenate, Input
from tensorflow.keras.models import Model
from tensorflow.keras.applications import ResNet50
Residual Block
Next, we begin with the implementation of the residual block.
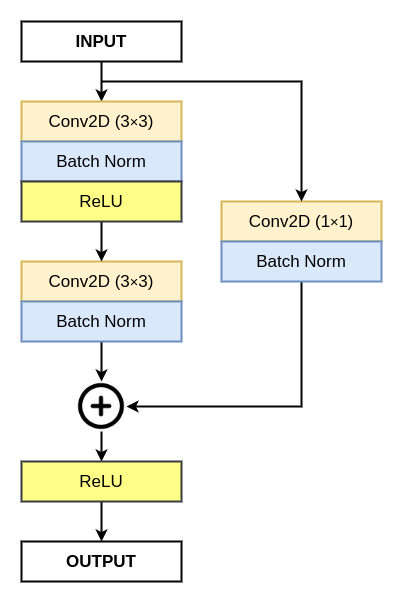
def residual_block(inputs, num_filters):
    x = Conv2D(num_filters, 3, padding="same")(inputs)
    x = BatchNormalization()(x)
    x = Activation("relu")(x)

    x = Conv2D(num_filters, 3, padding="same")(x)
    x = BatchNormalization()(x)

    s = Conv2D(num_filters, 1, padding="same")(inputs)
    s = BatchNormalization()(s)
    x = Activation("relu")(x+s)

    return x
Dilated Convolution Block
Now, we will implement a simple dilated convolution block.

def dilated_conv(inputs, num_filters):
    x1 = Conv2D(num_filters, 3, padding="same", dilation_rate=3)(inputs)
    x1 = BatchNormalization()(x1)
    x1 = Activation("relu")(x1)

    x2 = Conv2D(num_filters, 3, padding="same", dilation_rate=6)(inputs)
    x2 = BatchNormalization()(x2)
    x2 = Activation("relu")(x2)

    x3 = Conv2D(num_filters, 3, padding="same", dilation_rate=9)(inputs)
    x3 = BatchNormalization()(x3)
    x3 = Activation("relu")(x3)

    x = Concatenate()([x1, x2, x3])
    x = Conv2D(num_filters, 1, padding="same")(x)
    x = BatchNormalization()(x)
    x = Activation("relu")(x)

    return x
The dilated convolution helps the network to have a larger receptive field, allowing the network to see more context in the image, which is important for image segmentation tasks. This results in better performance in terms of accuracy and robustness.
By using dilated convolutions, the network can learn features at different scales, which is essential for image segmentation tasks, where objects can have different sizes and shapes.
Decoder Block
Next, we will build the decoder block for our image segmentation model.
def decoder_block(inputs, skip_features, num_filters):
    x = UpSampling2D((2, 2), interpolation="bilinear")(inputs)
    x = Concatenate()([x, skip_features])
    x = residual_block(x, num_filters)
    return x
The decoder block begins with a bilinear upsampling, followed by a concatenation with a skip connection. The skip connection is basically a feature map from the encoder with provides the decoder with high-level semantic information about the input image. The concatenation allows the decoder to use both the high-level semantic information and the upsampled feature map to generate a higher-resolution segmentation map.
After the concatenation, it is followed by a residual block, which acts as the output of the decoder block.
Image Segmentation Architecture
Now, we will use all the above blocks to build the main image segmentation architecture. The architecture has the following build blocks:
- Encoder Network: Pre-trained ResNet50
- Bridge: Dilated Convolution Block
- Decoder Network: Use of multiple decoder blocks.
- Deep Supervision: We will predict multiple masks from each decoder block for better performance.

The OUTPUT 4 is considered the final mask.
def build_model(input_shape):
    """ Input """
    inputs = Input(input_shape)

    """ Pre-trained ResNet50 Model """
    resnet50 = ResNet50(include_top=False, weights="imagenet", input_tensor=inputs)

    """ Encoder """
    s1 = resnet50.get_layer("input_1").output
    s2 = resnet50.get_layer("conv1_relu").output
    s3 = resnet50.get_layer("conv2_block3_out").output
    s4 = resnet50.get_layer("conv3_block4_out").output
    s5 = resnet50.get_layer("conv4_block6_out").output

    """ Bridge """
    b1 = dilated_conv(s5, 1024)

    """ Decoder """
    d1 = decoder_block(b1, s4, 512)
    d2 = decoder_block(d1, s3, 256)
    d3 = decoder_block(d2, s2, 128)
    d4 = decoder_block(d3, s1, 64)

    """ Deep Supervision """
    y1 = UpSampling2D((8, 8), interpolation="bilinear")(d1)
    y1 = Conv2D(1, 1, padding="same", activation="sigmoid")(y1)

    y2 = UpSampling2D((4, 4), interpolation="bilinear")(d2)
    y2 = Conv2D(1, 1, padding="same", activation="sigmoid")(y2)

    y3 = UpSampling2D((2, 2), interpolation="bilinear")(d3)
    y3 = Conv2D(1, 1, padding="same", activation="sigmoid")(y3)

    y4 = Conv2D(1, 1, padding="same", activation="sigmoid")(d4)

    outputs = Concatenate()([y1, y2, y3, y4])

    model = Model(inputs, outputs, name="U-Net")
    return model
We have now successfully implemented the image segmentation architecture. We will now begin with the training of the proposed architecture on the Person Segmentation dataset.
Training
The training of the proposed architecture has the following steps:
- Importing required libraries.
- Implementing the required functions.
- Defining the hyperparameters.
- Loading and splitting the dataset into training and validation.
- Building the dataset pipeline.
- Calling the model and training it.
Imports
First, we will import all the required libraries.
import os
os.environ["TF_CPP_MIN_LOG_LEVEL"] = "2"
import numpy as np
import pandas as pd
import cv2
from glob import glob
import scipy.io
from sklearn.model_selection import train_test_split
import tensorflow as tf
from tensorflow.keras.callbacks import ModelCheckpoint, ReduceLROnPlateau, EarlyStopping, CSVLogger
from model import build_model
Next, we will define some global variables – image height and width.
global image_h
global image_w
Now, we will write a function that would help in creating an empty folder, which would be later used to store the weight file.
def create_dir(path):
    if not os.path.exists(path):
        os.makedirs(path)
Load and Split Dataset
Now, we will write a function that will load the images and their respective binary masks. Next, we will split the dataset into training and validation sets.
def load_dataset(path, split=0.1):
    """ Loading the images and masks """
    X = sorted(glob(os.path.join(path, "images", "*.jpg")))
    Y = sorted(glob(os.path.join(path, "masks", "*.png")))

    """ Spliting the data into training and testing """
    split_size = int(len(X) * split)

    train_x, valid_x = train_test_split(X, test_size=split_size, random_state=42)
    train_y, valid_y = train_test_split(Y, test_size=split_size, random_state=42)

    return (train_x, train_y), (valid_x, valid_y)
Dataset Pipeline Functions
Now, we will begin working on building the dataset pipeline, which would be used in training the proposed architecture.
First, we will write a function to read an image.
def read_image(path):
    path = path.decode()
    x = cv2.imread(path, cv2.IMREAD_COLOR)
    x = cv2.resize(x, (image_w, image_h))
    x = x/255.0
    x = x.astype(np.float32)
    return x
Now, we will write a function to read the mask and prepare the appropriate ground truth. As our model predicts four masks, our ground truth would also contain four masks.
def read_mask(path):
    path = path.decode()
    x = cv2.imread(path, cv2.IMREAD_GRAYSCALE)
    x = cv2.resize(x, (image_w, image_h))
    x = x.astype(np.float32)    ## (h, w)
    x = np.expand_dims(x, axis=-1)  ## (h, w, 1)
    x = np.concatenate([x, x, x, x], axis=-1) ## (h, w, 4)
    return x
As both the above functions: read_image and read_mask uses OpenCV and NumPy. So, we cannot directly use them in TensorFlow. We will write a tf_parse, which would help us in using the above functions in TensorFlow.
def tf_parse(x, y):
    def _parse(x, y):
        x = read_image(x)
        y = read_mask(y)
        return x, y

    x, y = tf.numpy_function(_parse, [x, y], [tf.float32, tf.float32])
    x.set_shape([image_h, image_w, 3])
    y.set_shape([image_h, image_w, 4])
    return x, y
Now, we will implement our final function in the dataset pipeline process. Here, we will use the tf.data API to complete the dataset pipeline process.
def tf_dataset(X, Y, batch=2):
    ds = tf.data.Dataset.from_tensor_slices((X, Y))
    ds = ds.map(tf_parse).batch(batch).prefetch(10)
    return ds
Now, we are done with the implementation of the functions required for the training process. Now, we will begin with the execution part.
Execution of Functions to Train the Architecture
We begin by seeding the environment and creating a folder named results to save our files. After that, we will define the hyperparameters.
if __name__ == "__main__":
    """ Seeding """
    np.random.seed(42)
    tf.random.set_seed(42)

    """ Directory for storing files """
    create_dir("files")

    """ Hyperparameters """
    image_h = 512
    image_w = 512
    input_shape = (image_h, image_w, 3)
    batch_size = 4
    lr = 1e-4
    num_epochs = 100

    """ Paths """
    dataset_path = "../ML_DATASET/people_segmentation"
    model_path = os.path.join("files", "model.h5")
    csv_path = os.path.join("files", "data.csv")
Next, we will load the dataset and build the training and validation pipeline.
    """ Loading the dataset """
    (train_x, train_y), (valid_x, valid_y) = load_dataset(dataset_path, split=0.2)
    print(f"Train: {len(train_x)}/{len(train_y)} - Valid: {len(valid_x)}/{len(valid_y)}")
    print("")

    """ Dataset Pipeline """
    train_ds = tf_dataset(train_x, train_y, batch=batch_size)
    valid_ds = tf_dataset(valid_x, valid_y, batch=batch_size)
Now, we will compile the model and start with the training process.
    """ Model """
    model = build_model(input_shape)
    model.compile(
        loss="binary_crossentropy",
        optimizer=tf.keras.optimizers.Adam(lr)
    )

    """ Training """
    callbacks = [
        ModelCheckpoint(model_path, monitor='val_loss', verbose=1, save_best_only=True),
        ReduceLROnPlateau(monitor='val_loss', factor=0.1, patience=5, min_lr=1e-7, verbose=1),
        CSVLogger(csv_path, append=True),
        EarlyStopping(monitor='val_loss', patience=20, restore_best_weights=False)
    ]

    model.fit(train_ds,
        validation_data=valid_ds,
        epochs=num_epochs,
        callbacks=callbacks
    )
When the training is completed, the weight file would be saved in the files folder. You can download the model.h5 file from here: model.h5
Background Removal from Images
In this part, we are going to work on the predict.py file, where we use the trained model to remove the background from human images. So, we begin by importing all the required libraries.
import os
import numpy as np
import cv2
import pandas as pd
from glob import glob
from tqdm import tqdm
import tensorflow as tf
from train import create_dir

""" Global parameters """
image_h = 512
image_w = 512
We have also defined the height and width accepted by the model trained on the person segmentation dataset.
Now, we will begin with the execution. So, we will perform the following steps:
- Seed the environment.
- Create a folder to save the images
- Load the model.
- Load all the test images.
- Loop over all the images, process them and finally remove the background.
- Save the images.
if __name__ == "__main__":
    """ Seeding """
    np.random.seed(42)
    tf.random.set_seed(42)

    """ Directory for storing files """
    create_dir("test/masks")

    """ Loading model """
    model = tf.keras.models.load_model("files/model.h5")

    """ Load the dataset """
    data_x = glob("test/images/*")
Now, we are going to read all the test images from data_x list using a for loop. Inside the loop, we are going to perform the following steps:
- Extracting the name from each test image path.
- Reading the images.
- Feeding the images to the model and predicting a binary mask.
- Resize the mask.
- Perform an element-wise multiplication of the resized mask and the input to remove the background.
- Save the image.
    for path in tqdm(data_x, total=len(data_x)):
        """ Extracting name """
        name = path.split("/")[-1].split(".")[0]

        """ Reading the image """
        image = cv2.imread(path, cv2.IMREAD_COLOR)
        h, w, _ = image.shape
        x = cv2.resize(image, (image_w, image_h))
        x = x/255.0
        x = x.astype(np.float32) ## (h, w, 3)
        x = np.expand_dims(x, axis=0) ## (1, h, w, 3)

        """ Prediction """
        y = model.predict(x, verbose=0)[0][:,:,-1]
        y = cv2.resize(y, (w, h))
        y = np.expand_dims(y, axis=-1)

        """ Save the image """
        masked_image = image * y
        line = np.ones((h, 10, 3)) * 128
        cat_images = np.concatenate([image, line, masked_image], axis=1)

        cv2.imwrite(f"test/masks/{name}.png", cat_images)
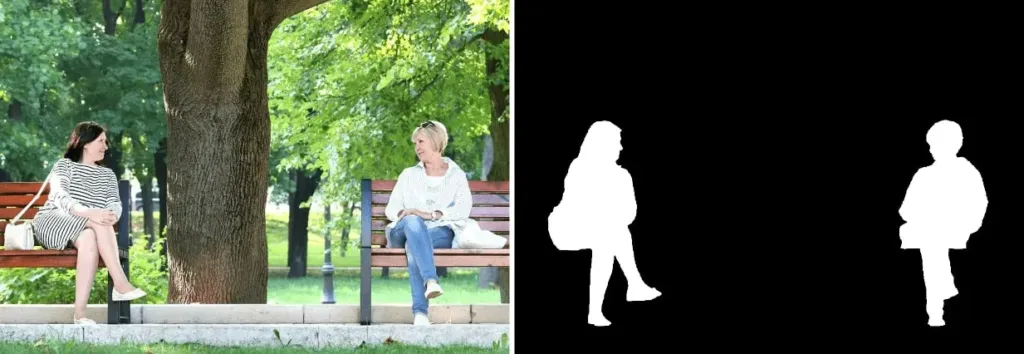
The result is shown below in two images, where the background is removed from the original images.


Summary
In this article, we have learned the process of performing background removal using image segmentation in TensorFlow. The steps include building an image segmentation architecture, using a person segmentation dataset to train the model, and finally using the trained model to predict and remove the background from images and videos.
The article also provides a comprehensive explanation of the fundamentals of image segmentation and how to implement it in TensorFlow.
Still, have some questions or queries? Just comment below. For more updates. Follow me.