In today’s tutorial, we will be looking at the DeepLabV3+ (ResNet50) architecture implementation in TensorFlow using Keras high-level API. Within this architecture, ResNet50 would be used as the encoder, which is pre-trained on the ImageNet classification dataset.
We will begin with the overall architectural understanding of the DeepLabV3+ and ResNet50. Furthermore, we will understand the salient features of the DeepLabV3+ architecture, which makes it one of the most widely used architectures.
Specifically, we will discuss the following in depth:
- What is DeepLabV3+?
- What is ResNet50?
- Implementation of the DeepLabV3+ with ResNet50.
Related Articles
- Human Image Segmentation with DeepLabV3+ in TensorFlow
- Polyp Segmentation using UNET in TensorFlow 2.0
What is DeepLabV3+?
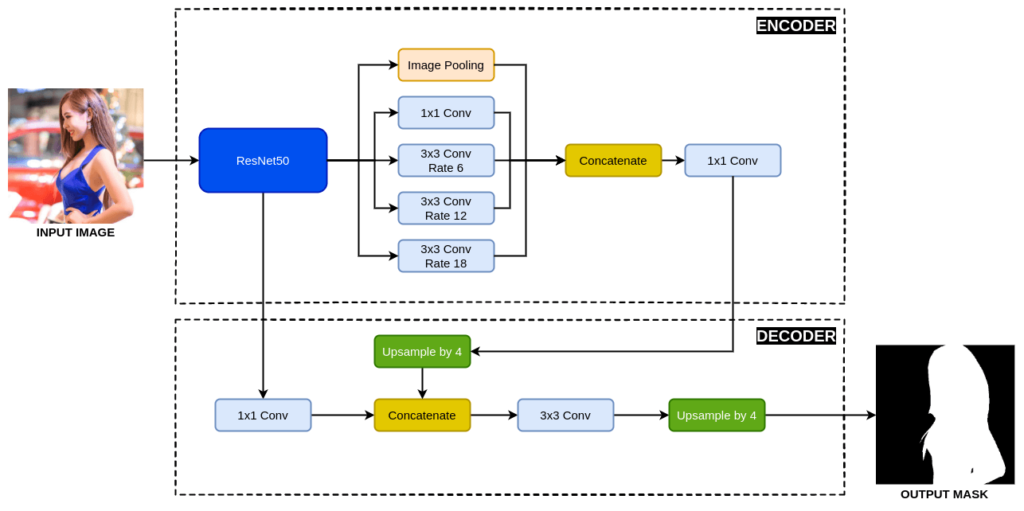
DeepLabV3+ is an encoder-decoder architecture proposed by Liang-Chieh Chen et al. from Google. The paper was presented at the European Conference on Computer Vision (ECCV) conference in the year 2018 held in Munich, Germany. The paper is cited more than 5000 times proving its popularity among the research community.
DeepLabV3+ Research Paper (Arxiv): Encoder-Decoder with Atrous Separable Convolution for Semantic Image Segmentation
DeepLabV3+ is an improvement over the existing DeepLabV3 architecture proposed by the same author. The authors extend the DeepLabV3 by adding the Atrous Spatial Pyramid Pooling (ASSP) in the decoder module to refine the segmentation results.
What is ResNet50?
ResNet-50 is a popular architecture that belongs to the ResNet family. It is 50 layers deep, with 48 convolution layers, 1 max-pooling layer and an average pooling layer at the end. The ResNet50 along with other variants are introduced in 2015 by Kaiming He, Xiangyu Zhang, Shaoqing Ren, and Jian Sun in their research paper titled Deep Residual Learning for Image Recognition.
READ MORE: What is Residual Network or ResNet?
DeepLabV3+ with ResNet50 Architecture Implementation
After learning about the DeepLabV3+ and the ResNet50 architectures, we applied this knowledge to implement the DeepLabV3+ with ResNet50 in the TensorFlow framework using the Keras high-level API.
Imports
We will begin by importing all the required libraries and functions.
import os
os.environ["TF_CPP_MIN_LOG_LEVEL"] = "2"

from tensorflow.keras.layers import Conv2D, BatchNormalization, Activation, UpSampling2D
from tensorflow.keras.layers import AveragePooling2D, Conv2DTranspose, Concatenate, Input
from tensorflow.keras.models import Model
from tensorflow.keras.applications import ResNet50
In Line 2, we set the value for the environment variable TF_CPP_MIN_LOG_LEVEL to 2. This prevents showing information/warning logs from TensorFlow.
In the next few lines, we import layers from TensorFlow required to build the DeepLabV3+. We also import the ResNet50, which we will use as an encoder.
Atrous Spatial Pyramid Pooling (ASPP)
Now, we will implement the Atrous Spatial Pyramid Pooling (ASPP) block, which connects the pre-trained ResNet50 and the decoder part of the network.
The ASPP block consists of five parallel groups of layers. These are:
- Image pooling
- 1×1 convolution
- Three dilated convolutions with dilation rates of 6, 12 and 18 respectively.
Now we would start working on each of the above five groups of layers.
def ASPP(inputs):
    shape = inputs.shape

    y_pool = AveragePooling2D(pool_size=(shape[1], shape[2]), name='average_pooling')(inputs)
    y_pool = Conv2D(filters=256, kernel_size=1, padding='same', use_bias=False)(y_pool)
    y_pool = BatchNormalization(name=f'bn_1')(y_pool)
    y_pool = Activation('relu', name=f'relu_1')(y_pool)
    y_pool = UpSampling2D((shape[1], shape[2]), interpolation="bilinear")(y_pool)
In Line 8, we define the ASPP function, which takes a tensor as an input. The tensor is the feature map from the encoder output.
In Line 9, we save the shape of the input tensor to the shape variable. The value of shape is:
shape = (batch size x height x width x filters)
In the next few lines, we perform the Image Pooling operations, where we first reduce the input tensor to 1×1 height and width respectively. Next, we perform a 1×1 convolution, followed by batch normalization and then a relu activation function. At last, we perform a bilinear upsampling and reshape the reduced feature map to the original shape.
        y_1 = Conv2D(filters=256, kernel_size=1, dilation_rate=1, padding='same', use_bias=False)(inputs)
        y_1 = BatchNormalization()(y_1)
        y_1 = Activation('relu')(y_1)
In the above code, we pass the input tensor through a 1×1 convolution, followed by batch normalization and then a relu activation function.
        y_6 = Conv2D(filters=256, kernel_size=3, dilation_rate=6, padding='same', use_bias=False)(inputs)
        y_6 = BatchNormalization()(y_6)
        y_6 = Activation('relu')(y_6)

        y_12 = Conv2D(filters=256, kernel_size=3, dilation_rate=12, padding='same', use_bias=False)(inputs)
        y_12 = BatchNormalization()(y_12)
        y_12 = Activation('relu')(y_12)

        y_18 = Conv2D(filters=256, kernel_size=3, dilation_rate=18, padding='same', use_bias=False)(inputs)
        y_18 = BatchNormalization()(y_18)
        y_18 = Activation('relu')(y_18)
Next, we apply three dilated convolution layers on the input tensor with a dilation rate of 6, 12 and 18 respectively. Each of convolution layer is followed by a batch normalization and a ReLU activation.
        y = Concatenate()([y_pool, y_1, y_6, y_12, y_18])

        y = Conv2D(filters=256, kernel_size=1, dilation_rate=1, padding='same', use_bias=False)(y)
        y = BatchNormalization()(y)
        y = Activation('relu')(y)
        return y
At last, we concatenate the output of all five layers. Next, it is followed by a 1×1 convolution, batch normalization and then a ReLU activation function.
Complete Architecture: DeepLabV3+
In this part, we will begin with the implementation of the DeepLabV3+.
def DeepLabV3Plus(shape):
    """ Inputs """
    inputs = Input(shape)

    """ Pre-trained ResNet50 """
    base_model = ResNet50(weights='imagenet', include_top=False, input_tensor=inputs)
We will first define a function with the name DeepLabV3Plus, which takes one argument, that is input shape. In the next line, we define the Input layer.
Next, we call the ResNet50, load the pre-trained weight and give it the input.
    """ Pre-trained ResNet50 Output """
    image_features = base_model.get_layer('conv4_block6_out').output
    x_a = ASPP(image_features)
    x_a = UpSampling2D((4, 4), interpolation="bilinear")(x_a)
After that, we extract a low-resolution feature map from the ResNet50 and pass it through the ASPP. The output of the ASPP is then passed through a bilinear upsampling layer, which increases its resolution by four times.
    """ Get low-level features """
    x_b = base_model.get_layer('conv2_block2_out').output
    x_b = Conv2D(filters=48, kernel_size=1, padding='same', use_bias=False)(x_b)
    x_b = BatchNormalization()(x_b)
    x_b = Activation('relu')(x_b)

    x = Concatenate()([x_a, x_b])
Now, we extract another feature map from the ResNet50, pass it through a 1×1 convolution layer, followed by a batch normalization and a ReLU activation. Now, we concatenate it with the previous upsampled feature map.
    x = Conv2D(filters=256, kernel_size=3, padding='same', activation='relu',use_bias=False)(x)
    x = BatchNormalization()(x)
    x = Activation('relu')(x)

    x = Conv2D(filters=256, kernel_size=3, padding='same', activation='relu', use_bias=False)(x)
    x = BatchNormalization()(x)
    x = Activation('relu')(x)
    x = UpSampling2D((4, 4), interpolation="bilinear")(x)
The concatenated output is followed by two 3×3 convolution layer. Each convolution layer is followed by a batch normalization and a ReLU activation function. At the end, we upsample the feature by a factor of four by using bilinear interpolation.
    """ Outputs """
    x = Conv2D(1, (1, 1), name='output_layer')(x)
    x = Activation('sigmoid')(x)

    """ Model """
    model = Model(inputs=inputs, outputs=x)
    return model
The upsampled output is then passed through a 1×1 convolution and sigmoid activation function to generate the binary segmentation mask.
The above code is written for binary segmentation. You can also use it for multiclass segmentation with two changes:
- Update the number of filters from 1 to the number of classes.
- Change the sigmoid activation function softmax.
Finally, we reach the end of our DeepLabV3+ architecture. Let’s execute the above DeepLabV3+.
if __name__ == "__main__":
    input_shape = (512, 512, 3)
    model = DeepLabV3Plus(input_shape)
    model.summary()
Conclusion
In this tutorial, we have implemented the DeepLabV3+ in TensorFlow. In addition, we have also learned about the Atrous Spatial Pyramid Pooling (ASPP) block. ASPP is used in multiple other segmentation networks for performance improvement.
Still, have some questions or queries? Just comment below. For more updates. Follow me.