Generative Adversarial Networks (GANs) have revolutionized the field of artificial intelligence, enabling the creation of realistic images from scratch. In this tutorial, we’ll dive into the implementation of a Deep Convolutional Generative Adversarial Network (DCGAN) specifically designed for generating Anime faces. Whether you’re a coding enthusiast or an anime aficionado, join us on this creative journey as we bring characters to life through the magic of deep learning.
Prerequisites
Before we begin, make sure you have the following installed on your machine:
- Python (3.6 or higher)
- TensorFlow (2.x)
- OpenCV
- Matplotlib
pip install tensorflow opencv-python matplotlib
Dataset
For this tutorial, we will be working with an Anime Faces dataset consisting of 21,551 anime faces scraped from www.getchu.com. These images have been cropped using an anime face detection algorithm and resized to 64 * 64 for convenience.
Importing Libraries
Let’s start by importing the required libraries for our project.
import os
import time
import numpy as np
import cv2
from glob import glob
from matplotlib import pyplot
import tensorflow as tf
from tensorflow.keras import layers as L
from tensorflow.keras.models import Model
from tensorflow.keras.optimizers import Adam
Constants and Helper Functions
Next, we’ll define constants for our image dimensions and create helper functions to streamline our code. These functions will aid in creating directories for saving our generated images and loading images from the dataset.
IMG_H = 64
IMG_W = 64
IMG_C = 3  ## Change this to 1 for grayscale.

def create_dir(path):
    if not os.path.exists(path):
        os.makedirs(path)

def load_image(image_path):
    img = tf.io.read_file(image_path)
    img = tf.io.decode_png(img)
    img = tf.cast(img, tf.float32)
    img = (img - 127.5) / 127.5
    return img

def tf_dataset(images_path, batch_size):
    ds = tf.data.Dataset.from_tensor_slices(images_path)
    ds = ds.shuffle(buffer_size=1000).map(load_image, num_parallel_calls=tf.data.experimental.AUTOTUNE)
    ds = ds.batch(batch_size).prefetch(buffer_size=tf.data.experimental.AUTOTUNE)
    return ds
Convolution and Deconvolution Blocks
Now, let’s define functions for convolution and deconvolution blocks. These blocks are fundamental to constructing our generator and discriminator models.
def conv_block(x, num_filters, kernel_size=4, padding="same", strides=1, activation=True):
    x = L.Conv2D(
        filters=num_filters,
        kernel_size=kernel_size,
        kernel_initializer=tf.keras.initializers.RandomNormal(mean=0.0, stddev=0.02),
        padding=padding,
        strides=strides,
        use_bias=False
    )(x)

    if activation:
        x = L.LeakyReLU(alpha=0.2)(x)
        x = L.Dropout(0.3)(x)
    return x

def deconv_block(x, num_filters, kernel_size=5, padding="same", strides=4):
    x = L.Conv2DTranspose(
        num_filters,
        kernel_size=kernel_size,
        strides=strides,
        padding=padding,
        kernel_initializer=tf.keras.initializers.RandomNormal(mean=0.0, stddev=0.02),
        use_bias=False
    )(x)
    x = L.BatchNormalization()(x)
    x = L.LeakyReLU(alpha=0.2)(x)
    return x
The use of Leaky ReLU instead of ReLU in the convolutional and deconvolutional blocks aims to mitigate the “dying ReLU” problem, enhancing the overall learning capacity of the network.
Build the Generator Model
Let’s dive into the core of our project by constructing the generator model. The generator takes random noise as input and transforms it into anime-like images.
def build_generator(latent_dim):
    noise = L.Input((latent_dim), name="noise_input")

    x = L.Dense(4*4*512, use_bias=False)(noise)
    x = L.BatchNormalization()(x)
    x = L.LeakyReLU()(x)
    x = L.Reshape((4, 4, 512))(x)

    x = deconv_block(x, 256, kernel_size=5, strides=2)
    x = deconv_block(x, 128, kernel_size=5, strides=2)
    x = deconv_block(x, 64, kernel_size=5, strides=2)
    x = deconv_block(x, 32, kernel_size=5, strides=2)

    x = conv_block(x,
        num_filters=3,
        kernel_size=5,
        strides=1,
        activation=False
    )
    fake_output = L.Activation("tanh")(x)

    return Model(noise, fake_output, name="generator")
This function defines the architecture of our generator, transforming latent noise into intricate anime face images.
Build the Discriminator Model
The discriminator is our art critic, distinguishing between real and generated images. Let’s construct this crucial component.
def build_discriminator():
    inputs = L.Input((IMG_H, IMG_W, 3), name="disc_input")

    x = inputs
    x = conv_block(x, 32, kernel_size=5, strides=2)
    x = conv_block(x, 64, kernel_size=5, strides=2)
    x = conv_block(x, 128, kernel_size=5, strides=2)
    x = conv_block(x, 256, kernel_size=5, strides=2)

    x = L.Flatten()(x)
    x = L.Dense(1)(x)

    return Model(inputs, x, name="discriminator")
This function crafts our discriminator, fine-tuned to discern the nuances between real and generated anime faces.
Training Step Function
Now, let’s delve into the training process of the DCGAN. The train_step function orchestrates the interplay between the generator and discriminator during each training iteration.
@tf.function
def train_step(real_images, latent_dim, generator, discriminator, g_opt, d_opt):
    batch_size = tf.shape(real_images)[0]
    bce_loss = tf.keras.losses.BinaryCrossentropy(from_logits=True, label_smoothing=0.1)

    ## Discriminator
    noise = tf.random.normal([batch_size, latent_dim])
    for _ in range(3):
        with tf.GradientTape() as dtape:
            generated_images = generator(noise, training=True)

            real_output = discriminator(real_images, training=True)
            fake_output = discriminator(generated_images, training=True)

            d_real_loss = bce_loss(tf.ones_like(real_output), real_output)
            d_fake_loss = bce_loss(tf.zeros_like(fake_output), fake_output)
            d_loss = d_real_loss + d_fake_loss

            d_grad = dtape.gradient(d_loss, discriminator.trainable_variables)
            d_opt.apply_gradients(zip(d_grad, discriminator.trainable_variables))

    with tf.GradientTape() as gtape:
        generated_images = generator(noise, training=True)
        fake_output = discriminator(generated_images, training=True)

        g_loss = bce_loss(tf.ones_like(fake_output), fake_output)

        g_grad = gtape.gradient(g_loss, generator.trainable_variables)
        g_opt.apply_gradients(zip(g_grad, generator.trainable_variables))

    return d_loss, g_loss
The provided code defines a training step function for a GAN (Generative Adversarial Network) using TensorFlow. The @tf.function decorator is used to convert the Python function into a TensorFlow graph for performance optimization. The function takes real images, latent dimension, generator, discriminator, and optimizer instances as inputs.
Within the function, the batch size is determined from the shape of real images, and binary cross-entropy loss with label smoothing is defined. The training process involves updating the discriminator three times in a loop. For each iteration, a random noise is generated, and the generator produces synthetic images. The discriminator evaluates both real and generated images, computes the adversarial and generator loss, and applies gradient descent to update the discriminator’s parameters.
In the subsequent gradient tape block, the generator loss is computed using the generated images and the discriminator’s response. Another round of gradient descent updates the generator’s parameters. The function returns the calculated discriminator and generator losses for monitoring training progress. This comprehensive training step is crucial for GANs to learn and improve their ability to generate realistic data.
Image Saving Function
Now, let’s create a function to visualize our generated masterpieces. The save_plot function combines multiple generated images into a captivating grid and saves it for us to admire.
def save_plot(examples, epoch, n):
    n = int(n)
    examples = (examples + 1) / 2.0
    examples = examples * 255
    file_name = f"samples/generated_plot_epoch-{epoch+1}.png"

    cat_image = None
    for i in range(n):
        start_idx = i*n
        end_idx = (i+1)*n

        image_list = examples[start_idx:end_idx]
        if i == 0:
            cat_image = np.concatenate(image_list, axis=1)
        else:
            tmp = np.concatenate(image_list, axis=1)
            cat_image = np.concatenate([cat_image, tmp], axis=0)

    cv2.imwrite(file_name, cat_image)
This function allows us to visually inspect the progression of our generated anime faces throughout training.
Main Code
Finally, let’s bring everything together in the main code. This section sets the hyperparameters, loads the dataset, builds the models, defines optimizers, and orchestrates the training loop:
if __name__ == "__main__":
    """ Hyperparameters """
    batch_size = 128
    latent_dim = 128
    n_samples = 100
    num_epochs = 1000

    """ Images """
    images_path = glob("/media/nikhil/BACKUP/ML_DATASET/Anime Faces/*.png")
    print(f"Images: {len(images_path)}")

    """ Folders """
    create_dir("samples")
    create_dir("saved_model")

    """ Model """
    g_model = build_generator(latent_dim)
    d_model = build_discriminator()

    g_model.summary()
    d_model.summary()

    """ Training """
    d_optimizer = tf.keras.optimizers.Adam(learning_rate=0.0002, beta_1=0.5)
    g_optimizer = tf.keras.optimizers.Adam(learning_rate=0.0002, beta_1=0.5)

    images_dataset = tf_dataset(images_path, batch_size)
    seed = np.random.normal(size=(n_samples, latent_dim))

    for epoch in range(num_epochs):
        start = time.time()

        d_loss = 0.0
        g_loss = 0.0
        for image_batch in images_dataset:
            d_batch_loss, g_batch_loss = train_step(image_batch, latent_dim, g_model, d_model, g_optimizer, d_optimizer)
            d_loss += d_batch_loss
            g_loss += g_batch_loss

        d_loss = d_loss/len(images_dataset)
        g_loss = g_loss/len(images_dataset)

        g_model.save("saved_model/g_model.h5")
        d_model.save("saved_model/d_model.h5")

        examples = g_model.predict(seed, verbose=0)
        save_plot(examples, epoch, np.sqrt(n_samples))

        time_taken = time.time() - start
        print(f"[{epoch+1:1.0f}/{num_epochs}] {time_taken:2.2f}s - d_loss: {d_loss:1.4f} - g_loss: {g_loss:1.4f}")
This main code orchestrates the training process, saving generated images at intervals, and printing progress updates.
Now, we are going to see the changes in the images generated at the first and the last epoch.
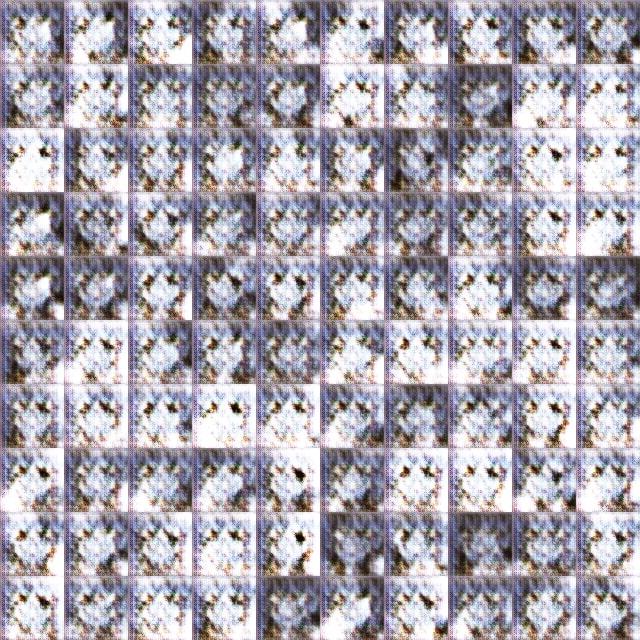
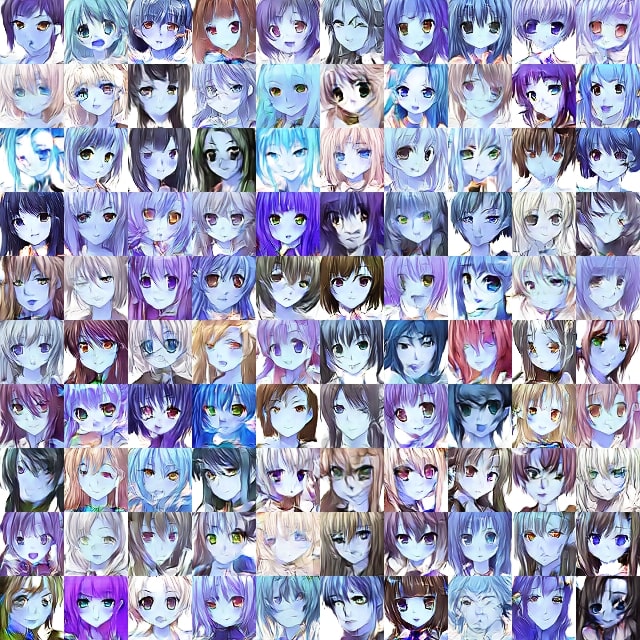
The difference between both images is visible. Finally, after training the DCGAN for about 202 epochs, we can generate realistic anime faces.
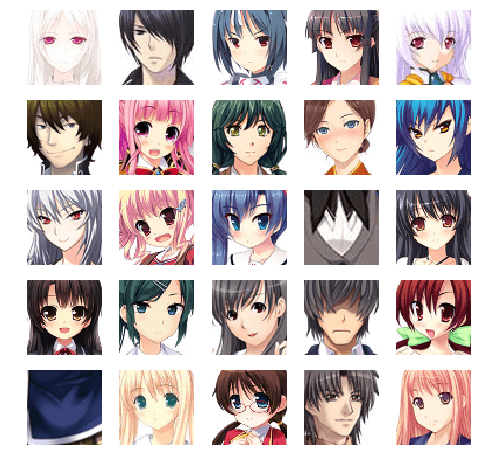
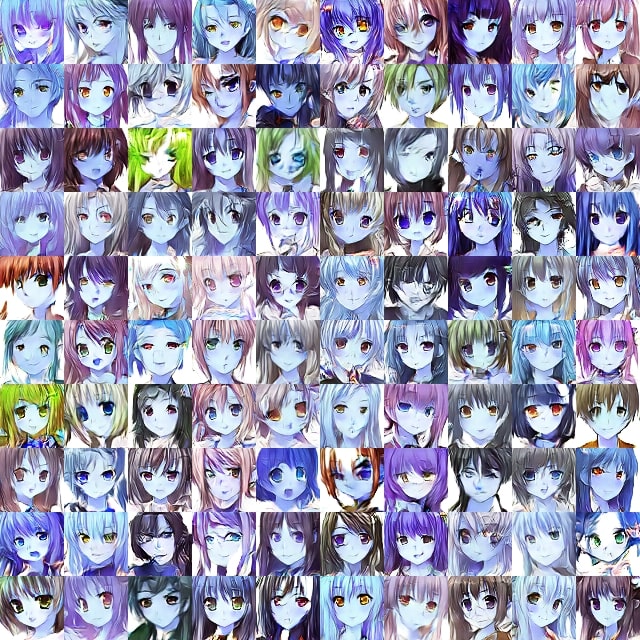
Now, let’s write the code to generate some anime faces using the generate trained till now.
Generating Images using Generator (DCGAN)
Now, let’s write code to generate anime faces using the trained generator.
import numpy as np
import cv2
from tensorflow.keras.models import load_model
from matplotlib import pyplot

def save_plot(examples, n):
    n = int(n)
    examples = (examples + 1) / 2.0
    examples = examples * 255
    file_name = f"fake_sample.png"

    cat_image = None
    for i in range(n):
        start_idx = i*n
        end_idx = (i+1)*n

        image_list = examples[start_idx:end_idx]
        if i == 0:
            cat_image = np.concatenate(image_list, axis=1)
        else:
            tmp = np.concatenate(image_list, axis=1)
            cat_image = np.concatenate([cat_image, tmp], axis=0)

    cv2.imwrite(file_name, cat_image)


if __name__ == "__main__":
    model = load_model("saved_model/g_model.h5")

    n_samples = 100
    latent_dim = 128
    latent_points = np.random.normal(size=(n_samples, latent_dim))
    examples = model.predict(latent_points)
    save_plot(examples, np.sqrt(n_samples))
This code imports necessary libraries, loads the pre-trained generator model, generates anime faces using random points in the latent space, and saves the generated images in a grid format.
Conclusion
This tutorial explored the implementation of a Deep Convolutional Generative Adversarial Network (DCGAN) for Anime face generation. From dataset preparation to model construction and training, the guide covered essential steps for enthusiasts and artists alike. The provided code and insights empower readers to delve into the intersection of deep learning and artistic expression, creating their own unique anime face generator.
Still have some questions, comment below and I will do my best to answer. For more updates. Follow me.
Read More
- Deep Convolutional Generative Adversarial Network by TensorFlow.
- DCGAN TUTORIAL by PyTorch.